Tuesday, April 26, 2011

Roasted Asparagus & Tomato Salad with Basil-Mint Aioli


I served asparagus this weekend with our Easter feast.  I wanted to do something a little different so decided that aioli would be the perfect complement.  In fact, I was inspired to do this from a salad we had recently while out to dinner at a new joint in downtown St. Paul.  They offered what they called a Farmers Market Salad that changed daily with the market offerings and what was fresh.  The night we went it consisted of roasted fingerling potatoes, asparagus, and arugula in a tarragon aioli topped with feta cheese.  Whoooaa.  Fantastic. I've been thinking about that salad ever since......

So, there I was, Easter on my coattails, and a menu that had yet to be constructed.  I had to do an aioli with the asparagus, just had to.  But instead of tarragon I wanted to test out basil and mint, that combination has always intrigued me.  I made this aioli the traditional way with raw egg - now, I know that freaks people out, but there's really no harm in it.  I used the yolks, not the whole egg.  If you truly can't get over it then use mayo instead.


The aioli with the asparagus was outstanding.  Simple, flavorful, fresh.  It was gobbled up by the crew.  I had some aioli leftover along with an extra bunch of asparagus, and about a cup of baby heirloom tomatoes hanging out in the fridge - what did I do with it all, you ask?  I made this roasted salad - and topped it with feta, just like they did at the restaurant.  A great way to use up ingredients!  And a healthy meatless Monday meal.  I'm afraid to eat asparagus any other way....except if there's a poached egg involved....


Get your spring on!

Roasted Asparagus & Tomato Salad with Basil-Mint Aioli
Recipe by A Toast to Taste
Inspired by Black Sheep Pizza

Ingredients Needed:
1 bunch asparagus
1 cup baby heirloom tomatoes (grape or cherry are fine, too)
2 Tbsp olive oil
salt and pepper to taste
feta cheese, crumbled

1 egg yolk
1 clove garlic, peeled
1 Tbsp dijon mustard
1 tsp salt
juice from half a lemon
1/2 cup basil leaves
1/4 cup mint leaves
1 cup olive oil

Preheat oven to 375 degrees.  Line a baking sheet with foil and top it with a baking rack.  Rinse asparagus and tomatoes, pat dry, and place on rack.  Drizzle with olive oil, and season with salt and pepper.  Roast for 15 minutes.

While veggies are roasting, prepare the aioli.  In bowl of food processor, add yolk, garlic, mustard, salt, lemon juice, basil, and mint.  Pulse a few times to combine well.  With the processor on, slowly pour in the olive oil.  Mix until well combined or until your desired thickness.

Toss veggies with aioli, top with feta, and enjoy!


Monday, April 25, 2011

Jerk Chicken with Mango Relish & Coconut Lime Rice


Clearly I'm in a tropical depression (name that tune).  Maybe it's because we didn't head south for turquoise waters and calm sea breezes this spring, or maybe it's because it just plain 'ol won't warm up here.  I don't know.  But I've had a hankering for all things tropical the past couple weeks, and this dish is no shortage of that.

Years ago I spent Christmas with my family in Jamaica.  It was definitely a vacation to remember not only for the sun and sand [and massive amounts of rain that fell], but because the resort we stayed at served the most divine, flavorful, can't-stop-eating-it grilled Jerk chicken.  We tried for years to replicate it back home and have come close, but nothing can match the stuff we had there.

Well, I'm trying it again.  According to Wikipedia, Jamaican Jerk Spice principally relies upon two items:  allspice and Scotch bonnet peppers.  I had the allspice, not the peppers.  That's ok, I just used cayenne pepper instead.  Worked perfectly for me.  I topped it with a mango relish and served with a coconut lime rice.  TO DIE FOR.  All very simple, full of flavor, and easy on the summer figure.


I added this whole meal to my mental "make again" list the second I bit into the chicken with a wedge of mango relish followed by the rice. 

Hankering for coconut fulfilled.  Tropical depression over. 


Jerk Chicken with Mango Relish & Coconut Lime Rice
Recipe by A Toast to Taste

For the Jerk Chicken
4 skinless, boneless chicken breasts
2 scallions, thinly sliced
2 garlic cloves, minced
1 tsp allspice
1 tsp dried thyme
1 tsp ground ginger
1 tsp nutmeg
1/2 tsp paprika
1/4 tsp cayenne pepper
2 tbsp brown sugar
salt and pepper
1/4 cup vegetable oil

For the Mango Relish
1 mango, peeled and cubed
1/4 cup red onion, diced
1/4 cup cilantro, roughly chopped
juice of 1 lime

For the Coconut Lime Rice
2 cups basmati rice
2 1/2 cups chicken stock
1 Tbsp butter
dash of salt
1/2 cup slivered almonds, toasted
1/2 cup shredded coconut, toasted
zest from 1 lime
juice from 1/2 lime

In a large mixing bowl, combine all seasoning for chicken.  Whisk in oil.  Transfer to a gallon size baggie with chicken and marinate for at least 8 hours (or overnight).  Heat grill to medium heat, cook for 6 minutes on each side. 

While the chicken is cooking, prepare the mango relish.  Add cubed mango, red onion, cilantro, and lime juice to a small mixing bowl.  Stir to combine well. 

Prepare the rice - In a medium sauce pan, bring chicken stock, butter, and dash of salt to a boil.  Stir in rice, turn heat to low and simmer, covered, for 18-22 minutes.  Fluff with fork, remove from heat, and add almonds, coconut, lime zest, and lime juice.  Stir to combine well.

Serve chicken with mango relish atop the rice and enjoy!

Thursday, April 21, 2011

Penne alla Vodka


Well, my husband officially told me last night that this is his new favorite dish.  Not surprising - it contains pasta, vodka, and cream.  How could it not be??!

If you haven't noticed by now, I usually make a pasta meal at least once a week.  They're easy, versatile, and virtually fail-proof.  They also make perfect leftovers.  When we have the time, we use homemade noodles.  We usually make a large batch and freeze them for future use.  We are due for another since the freezer has been empty now for the past month or so.  I do highly recommend making your own pasta.  We usually crack open a bottle of wine, turn up the Italian tunes, and go to town.  I make the dough, hubby rolls and cuts, then I hang the pasta to dry.  We have our own somewhat chaotic process, but one thing is for sure - it's relaxing, puts us in a good mood, and reminds us that we really are a good team together.  Just make sure you have one of these on hand:


On to last night's dinner.  Years ago I had made this dish and remember it being quite good.   There are a ton of different recipes out there for Penne alla Vodka but I came up with my own, using the staples (pancetta, vodka, and cream) as a starting point.  It turned out fantastic - was pretty hard to stop eating this one!  I had to physically remove the remaining pasta after my husband's third bowl....not sure his waistline is too happy today...ahem.  But it was so worth it.  Pasta, vodka, and cream - if you're not on this gravy train you're missing out!

Enjoy!


Penne alla Vodka
Recipe by A Toast to Taste

Ingredients Needed:
1 Tbsp butter
2 shallots, finely chopped
3 cloves garlic, minced
1/2 cup pancetta, diced
2 tsp crushed red pepper flakes
1 28oz can crushed tomatoes
1/2 cup vodka
1 Tbsp dried basil (use fresh if you have it)
pepper to taste
1/2 cup heavy whipping cream

finely grated parmessan cheese

In a large skillet, melt butter over medium heat.  Add the shallots, cook until translucent, about 3 minutes.  Add the garlic and cook for 1 minute, followed by the pancetta.  Stir to combine and cook for a good 5 minutes.  Season with crushed red pepper flakes.  Pour in tomatoes, vodka, basil and stir well to combine.  Season with pepper.  I did not add any salt because the pancetta is already pretty salty.  Let sauce simmer for about 15 minutes, stirring frequently.  Add cream, cook for another 5 minutes.

While the sauce is simmering, cook pasta according to instructions on box and drain.  Add pasta to sauce in skillet, mix well.  Transfer to serving dish.  Top with parmessan and enjoy!


Wednesday, April 20, 2011

Glazed Lemon Bundt Cake with Mixed Berry Sauce


I promised myself I wasn't going to talk about the weather anymore - well at least not until next December when we're battling below zero temps and continuous snow storms.  But, I have to express my disgust today.  It's April 20th.  And it's snowing!!!  S-N-O-W-I-N-G.  Seriously.  So that's why I'm posting this Lemon cake with mixed berry sauce so I can say, "Screw You Winter!!".  I'm so over it!!  Over it!

Ok, Lemon cake.  Num.  Lemon cake with mixed berry sauce.  Nummmm.  I served this for dessert at my brunch last weekend.  It was so nice and springy.  The mixed berry sauce was the perfect complement to the lemon, nice and tart.  A bit of sunshine on a cloudy day.


I loved how dense this cake was, and it had just the right amount of zing from the lemon zest.  Make sure you grease the bundt pan very well so it's easier to remove after it's been baked.  I've made that mistake in the past and it's not pretty.  Trust me. 

This cake is the perfect addition to any spring feast....especially Easter, which just happens to be this coming Sunday....serve with or without the sauce.


Happy Eating!

Glazed Lemon Bundt Cake with Mixed Berry Sauce
Original Recipe from Allrecipes.com
Adapted by A Toast to Taste

For the Cake
1 cup butter, softened
2 cups sugar
4 large eggs
2 Tbsp lemon juice
1.5 tsp vanilla extract
3 cups ap flour
2 tsp baking powder
1/2 tsp salt
1 cup buttermilk
zest from 2 small lemons

For the Glaze
2 cups powdered sugar
2 Tbsp lemon juice
1 tsp vanilla extract

For the Mixed Berry Sauce
1 pint organic blueberries
1 pint organic raspberries
1 pint organic blackberries
1 Tbsp lemon juice
2 Tbsp raw cane sugar

Preheat oven to 350 degrees.  Grease bundt pan and set aside.

In a large mixing bowl, cream butter and sugar.  Add the eggs, one at a time, and beat well after each addition.  Beat in the lemon juice and vanilla.  In a separate bowl, combine flour, baking powder and salt.  Add to creamed mixture alternately with buttermilk.  Stir in lemon zest.  Pour into greased bundt pan and bake for 60-70 minutes, or until a toothpick inserted comes out clean.  Cool for 10 minutes and invert onto wire rack.  Cool for 10 minutes longer.  Place wire rack over piece of foil or parchment paper for glazing.

To make the glaze:  beat powdered sugar, lemon juice, and vanilla until creamy.  Pour evenly over cooled cake, letting the extra drip onto the foil or parchment under the wire rack.

To make the berry sauce:  In a large saucepan, add berries, lemon juice and sugar.  Heat over medium high heat, stirring frequently.  Simmer for 15 minutes.  Spoon over slice of cake and enjoy!

Tuesday, April 19, 2011

Fresh Ricotta, Caramelized Onion, & Prosciutto Pizza


Pizza.  Just say the word and my mouth starts to water.  I do love a good pizza, and we have a couple decent joints close to us that we order from every so often.  But, what I love even more is making my own at home.  Not only is it a fun activity, but this way I know exactly what's in it.  Yeast and I don't have a good relationship so I used Trader Joe's all natural refrigerated pizza dough.  But if you're in with the yeast, by all means please make your own crust!  Some day it will like me, I have hope....


For tonight's pizza I wanted to use up my fresh ricotta I had leftover from the weekend.  I thought it would go well with some caramelized onion, heirloom tomatoes, olives, crushed red pepper flakes, and prosciutto.  I brushed the base of the crust with some of this fabulous seasoned olive oil we got from a local Italian joint here in the Cities.  It's out of this world taste!  And I knew it would add just the right flavoring to the pizza.


I caramelized the onion - added about a tablespoon of brown sugar to give them that sweet but savory taste and laid them on top of the oil-brushed crust followed by the rest of the toppings.  Baked this beauty for 15 minutes and this pie came out looking so divine.  Crunchy prosciutto, creamy ricotta, tangy olives....my gosh, how we had any leftovers from this baby is beyond me.

Save some gas - make your own pizza at home tonight!

Happy Eating!

Fresh Ricotta, Caramelized Onion, & Proscuitto Pizza
Recipe by A Toast to Taste

Ingredients Needed:
1 refrigerated pizza dough at room temperature (or you can make your own)
2 Tbsp seasoned olive oil (garlic is best)

2 Tbsp olive oil
1 Tbsp butter
1 medium red onion, thinly sliced
1 Tbsp brown sugar

1 cup fresh ricotta
6 mini heirloom tomatoes, halved
15 olives
1 tsp crushed red pepper flakes
5 slices prosciutto

Preheat oven to 450 degrees.  Spray a pizza pan with non-stick spray. 

In a large skillet, heat the olive oil and butter over medium low heat.  Add the onions and brown sugar.  Stir to combine and let cook for about 20 minutes, stirring frequently, until the onions are a light brown color.  Remove from heat.


Flour work surface and roll out pizza dough to 12 inch circle with rolling pin.  Transfer to greased pizza pan.  Brush with seasoned oil.  Now we start to build.  Start with the caramelized onions and spread in an even layer across the dough, leaving about an inch for the crust.  Next add the fresh ricotta, followed by the tomatoes, olives, and crushed red pepper.  At this point, I did drizzle a little olive oil over everything.  Then lay the slices of prosciutto over the pizza.  Bake in preheated oven for 15-17 minutes or until bubbly and golden brown.


Slice, serve, and eat....and eat.....and eat...


Monday, April 18, 2011

Spring Entertaining: Brunch Recipes and Themes


I hosted a brunch this weekend with a group of my college girlfriends.  We celebrated a recent marriage and an upcoming baby.  The theme:  French Garden, complete with vintage accessories, decorative hens and birds, sunflowers, freesia, and the ubiquitous bird cage.  I love to entertain - and also know that many people don't share those same sentiments about it.....but what they don't know is that it doesn't have to be overwhelming and expensive.  It's all in the preparation and planning.  The more you do ahead of time, the easier it is for you to be an involved host. 

On the Menu:
Prosecco Mimosas with Fresh Squeezed Orange Juice
Mini Herbed Frittatas (recipe below)
Maple Roasted Bacon
Ricotta, Cinnamon, and Honey Casserole
Mixed Greens Salad with Grapes, Candied Pecans, and Goat Cheese (recipe below)
Huge fruit platter 
Lemon Cake with Powdered Sugar Glaze and Mixed Berry Sauce (recipe to come)


Mixed Greens with Red Grapes, Candied Pecans, and Goat Cheese

Mini Herbed Frittatas


Freesia


What a fun afternoon!  Good food, good conversation, good company.  It's amazing how we've changed over the years....convos now revolve around kids and the things our mothers never told us.  We talk about house projects, the days of past that we used to sleep in AND take a nap all in the same day, those fun nights we spent on Santorini - oh how we miss them so, and our trials and tribulations of dealing with our newly inherited families (aka the in-laws) that we love.  We cherish these times together - after all, they happen far too infrequently.  And isn't this why we entertain anyways?  To bring our nearest and dearest together and create memories?  I think so.

On to the recipes.  These are simple dishes that can serve double duty as brunch items or just plain 'ol breakfast on Saturday morning.  They are full of flavor and take very little time to prep. 

Happy Brunching!

Mini Herbed Frittatas
Recipe by A Toast to Taste

Ingredients Needed:
10 large eggs
3/4 cup milk (I used skim, whole is best)
2 Tbsp fresh dill, chopped
1 Tbsp fresh chives, chopped
3 Tbsp finely grated parmessan
salt and pepper to taste

Preheat oven to 375 degrees. Grease a muffin tin and set aside.

In a large mixing bowl, whisk eggs, milk, herbs, parmessan, salt and pepper together until well combined.  Fill prepared muffin cups with egg mixture almost to the top.  Bake in preheated oven for 10-12 minutes or until center is set and tops are lightly golden.  Using a fork, loosen the frittatas from the cups and place on serving platter.  Serve and enjoy!


Mixed Greens with Red Grapes, Candied Pecans, and Goat Cheese
Original Recipe from Bitchincamero
Adapted by A Toast to Taste

For the Pecans
8 oz pecan halves
1 Tbsp sugar
1 Tbsp honey
1/2 tsp cinnamon

For the Salad
4 large handfuls mixed greens
15 red grapes, sliced in half
2 oz goat cheese, crumbled

For the Dressing
1/4 cup olive oil
2 Tbsp lemon juice
2 Tbsp apple cider vinegar
1 small shallot, minced
salt and pepper to taste

Preheat oven to 300 degrees.  Place pecans on foil-lined baking sheet and drizzle with sugar, honey, and cinnamon.  Mix together using a spoon and make sure everything is well coated.  Roast for 20-25 minutes.  Let cool.

While pecans are roasting, prep other salad ingredients and make vinegarette by whisking all ingredients together until emulsified.

Dress greens and top with grapes, pecans, goat cheese.

Enjoy!

Wednesday, April 13, 2011

Grilled Cheese with Vermont Cheddar & Prosciutto


Did you know that April is National Grilled Cheese Month?  I'm celebrating today.

When I think of grilled cheese my mind automatically wanders back to my childhood.  Grilled cheese was a staple in my diet back then, and still, to this day, the smell of buttered bread toasting in a pan brings back such vivid memories.  Back in those days, my parents literally had to pull us into the house to eat because we were so busy playing outside with the neighborhood kids.  We weren't watching TV, playing video games, or social networking on our computers and cell phones.   We were playing tag in the backyard.  Building forts in the woods.  Riding our bikes up and down the gravel roads.  Playing tennis against the garage door.  Racing our big wheels down the hill in the front yard.  We used our imaginations.  And that's what fueled our lives and our brains.  We sat down as a family for dinner each night.  We had consequences for bad behavior.  We were taught the value of hard work, and that we can't win at everything we do.  My how things have changed in this society.  What happened to those good ole days? 


I digress...back to the sandwich.  This grilled cheese is a riff on the classic, geared more towards my grown-up tastes.  For years I have tried to find a sharp cheddar that I liked, and have finally found one that I literally cannot stop eating.  Enter Cabot Sharp Cheddar from Vermont.  This stuff is dreamy.  It's tangy, creamy, salty, over the top flavor.  Plus, it melts like a charm in a grilled sandwich.  Add prosciutto and you won't be able to stop eating these.  I'm not joking. 

Bread, butter, cheese, prosciutto all toasted on rustic Italian bread.  Pure joy!  The key to this sandwich is to cook it low and slow - I even covered the pan with the top for a couple minutes to aid in the melting process.  If you cook it too high you will end up with burned bread and unmelted cheese.  Who wants that?  Not me!  Just remember - low and slow.

Happy Grilled Cheese Month!

Grilled Cheese with Vermont Cheddar & Prosciutto
Recipe by A Toast to Taste

Ingredients Needed:
2 slices Italian Bread
1 Tbsp butter, softened for spreading
5 very thin slices of Cabot Sharp Cheddar (white) - they come in blocks in my store
1-2 slices prosciutto

Makes 1 sandwich

Spread butter on one side of each slice of bread and place buttered side down on a plate for assembly.  Place 3 slices of cheese on one slice of bread followed by slice(s) of prosciutto and then the remaining slices of cheese.  Cover with remaining slice of bread, butter side up.  Heat skillet over low heat, add sandwich.  Cook on one side for about 4-5 minutes or until golden brown and flip with spatula, being careful that sandwich does not fall apart, and cook another 4-5 minutes on other side until golden brown.  You may add the cover to your pan for a couple minutes to aid in the melting.  Remove sandwich from pan and transfer to plate, cut in half, and enjoy!

Tuesday, April 12, 2011

Marinara, Lightened Up!


We got a ton of heirloom tomatoes from our CSA share last year.  A ton.  So many in fact that I couldn't eat or use them fast enough.  I had to do something to prevent from having to throw half of them out - and I couldn't fathom that because they were soooo fabulous and flavorful.  The light bulb came on in my head.  I got out my stock pot, filled it with water and tomatoes and boiled away.  I cored, seeded and peeled them, placed them in ziploc bags, and threw 'em in the freezer for use during the winter.  Brilliant!

Well, here it is the middle of April and I haven't used any of them.  I had grand plans to make sauces and salsas throughout the winter.  Clearly that never happened.


So, time to put these babies to use!  I wanted to make a marinara - but a lighter version for spring.  I thawed the tomatoes, pulsed them in the food processor for a minute or so and added them to onion, garlic, basil, oregano, and red pepper flakes.  No wine, no tomato paste, just tomatoes and herbs.  This sauce was so fresh and light.  The perfect complement to our 70 degree day!

I served this with some Bucatini, chopped fresh basil, and grated parmessan.  Splendid!  Tasty, and so easy.

Happy Eating!


Marinara Light
Recipe by A Toast to Taste

Ingredients Needed:
olive oil
4 cups fresh peeled, cored, and seeded tomatoes (or use a 28 oz can crushed tomato if fresh are not available)
1/2 large yellow onion, chopped
3 cloves garlic, finely chopped
1 tsp red pepper flakes
1 Tbsp dried basil
2 tsp dried oregano
salt and pepper to taste

1 lb favorite pasta
fresh basil, loosely chopped
finely grated parmessan cheese

In the bowl of a food processor, add tomatoes and pulse for about 1 minute or until well combined.  You want them to be smooth (see image above).  Set aside.

In a large skillet, heat olive oil over medium heat.  Add onion and cook for 3-4 minutes.  Add garlic, cook for another minute.  Pour in tomatoes, and stir to combine with onion mixture.  Season with basil, oregano, red pepper flakes, salt and pepper.  Let sauce simmer for 20 minutes, stirring frequently.

While the sauce is simmering, cook the pasta according to directions on box (or you could use fresh pasta).  Drain and add noodles to sauce in skillet.  Combine and transfer to a serving bowl.  Top with fresh basil and parmessan cheese.  Enjoy!


Monday, April 11, 2011

Cheddar & Chive Buttermilk Biscuits


I seem to have ticked someone off pretty badly lately.  Bad karma has been following me around like crazy.  Last week, something major went wrong every day.  The water heater exploded and flooded our main living area.  We had no hot water for 3 days....which just led to greasy hair [thank goodness I work at home], piles of dirty dishes, and two very cranky homeowners.  In an effort to boost our spirits, we got the patio furniture out.  Table, chairs, umbrella and stand - the whole deal.  The weather was warming up, the sun was out, we were planning to entertain on Friday evening - PERFECT!  We were so excited.  I left to take the dog for a walk and came home to our umbrella half way down the street and our glass-top table smashed into a zillion little pieces.  Completely ruined.....and glass everywhere.  I wanted to cry.  In the meantime, the dog got her leash wrapped around my ceramic handpainted planter and sent it flying into a stone paver wall....smashed into a million little pieces.   Haz mat control!  The good news:  we are all healthy and alive.  These are all just "things" and can be replaced.  But it was really just enough to put a major cramp in my style.


Moving on.  It's a new week, time for a new beginning.  My husband came down with a spring cold this weekend [ya, that was another kink in the week].  He usually craves comfort food when he's sick so I made an extra spicy batch of my Spicy Bean Soup with Shredded Chicken.  I've had a quart of buttermilk taking up room in my fridge so thought these cheddar and chive buttermilk biscuits would be the perfect complement to the soup.  Total comfort all the way.  I think he's cured now....

I admit that I haven't had the best of luck with biscuits in the past.  But I was determined to get it right this time.  These biscuits turned out so wonderful - soft, flaky, full, flavorful.  They were everything I was hoping for.  And the best part - they were so incredibly easy. 

Switch up the flavors to your liking and enjoy a batch today! 


Cheddar & Chive Buttermilk Biscuits
Original Recipe from Sweet Pea's Kitchen
Adapted by A Toast to Taste

Ingredients Needed:
1 3/4 cup ap flour
3/4 cup corn meal
4 tsp baking powder
1 tsp baking soda
1 tsp salt
1/2 stick cold, unsalted butter, cut into cubes
1.5 cups extra-sharp cheddar, shredded
3 Tbsp parmessan, finely grated
1/3 cup fresh chives, chopped
1 1/3 cup buttermilk

Preheat oven to 450 degrees.  Line a baking sheet with parchment paper or a Silpat.

In a food processor fitted with the dough blade, add flour, corn meal, baking powder, baking soda, and salt.  Pulse a few times to mix.  Add the butter.  Pulse until texture resembles coarse cornmeal, with the butter pieces no larger than small peas.  The rest of the work will be done by hand.  Pour mixture into large mixing bowl.  Stir in cheeses and chives.  Then add buttermilk and stir by hand until just combined.  Do not overmix.  Drop dough into 8-10 (depending on the size you want them) equal mounds, about 2 inches apart on the baking sheet.  Bake 12-14 minutes, or until golden brown.  Cool on wire rack for 10 minutes, serve, and enjoy!

Thursday, April 7, 2011

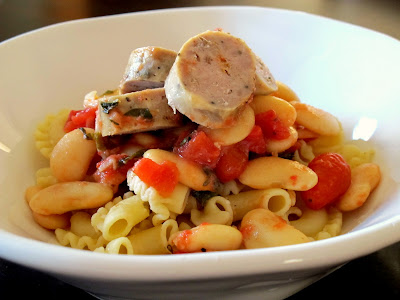
Italian Sausage, White Bean, & Tomato Bake


It's not always an easy feat trying to find really good Italian Sausage here in Minnesota. Potato sausage? Sure, no problem, with all the Scandinavians (including me) that call this place home it's quite easy. But, there are few places here in the Twin Cities that procure and sell quality, authentic Italian goods - and I rarely have time to ever get to them. Thanks to my mom who stopped by one recently, and got enough sausage to share with me. What a treat!

This week has been crazy busy, so I've been strapped for time when it comes to making dinner.  I threw this sausage together with some white beans, tomato, garlic, and herbs, and baked it for 30 minutes.  The house smelled divine while this was in the oven.  Now, at this point you could just serve with some crusty french bread, a nice side salad, and call it a day.  Or you can be like me and serve it atop some browned butter pasta.  Oh my goodness. 


Whatever you choose, this dish was so tasty and flavorful.  The sausage was outstanding - and was such a perfect match with the tomatoes and beans. 

Enjoy this one!

Italian Sausage, White Bean, & Tomato Bake
Recipe by A Toast to Taste
Photos by A Toast to Taste 

Ingredients Needed:
1 lb Italian Sausage
1 15oz can diced tomatoes (or a pint of fresh grape tomatoes - I used a combo of both)
2 15 oz cans white beans (I used butter beans)
5 cloves garlic, smashed
2 Tbsp fresh basil, chopped
1 Tbsp fresh thyme, removed from stem
drizzle of olive oil
salt and pepper to taste

To serve with Browned Butter Pasta:
1 lb pasta - your choice
3 Tbsp butter
1/4 cup pecorino romano cheese, finely grated
salt and pepper to taste

Preheat oven to 375 degrees.

To a 9x13 baking dish add beans, tomatoes, sausage, garlic, and herbs.  Drizzle with a little olive oil and season with salt and pepper.  Transfer to preheated oven and bake for 30 minutes.

At this point, if you plan to eat the dish as-is then you're done!  But, if you want to serve with the pasta, then while the dish is baking, bring a large pot of water to a boil.  Cook pasta according to instructions on the box.  Drain and set aside.

Heat large skillet over medium heat.  Add butter.  Once the butter is melted it will foam up and then subside.  Brown specks will begin to appear at the bottom of the pan.  Smell the butter - it should have a nutty aroma at this point.  Remove from the heat and place on cool surface to prevent further cooking.  Add drained pasta, cheese, salt and pepper, and toss together.  Spoon into bowl, top with sausage dish.


Wednesday, April 6, 2011

Taco Night!


Everyone loves tacos, right? They're fun, messy, spicy, crunchy, all out goodness. You really can't go wrong with a taco.

We went old school last night - seasoned meat, lettuce, tomato, cheese, black olives, and sour cream. The perfect combination of classic all in one. I've been making tacos for quite a few years. I made them often in college and continued in those first few years of living on my own in the real world after college....and I always used the store bought packet of taco seasoning. It worked perfectly! But, these days I'm a little more concerned with what I'm putting in my body and decided to read what was actually in those little 99 cent spice packets. YIKES!! They are full of ingredients I can't even pronounce. No way am I putting that stuff in my meat.


So, back to drawing board. I'm making my own. S-i-m-p-l-e. And I couldn't even tell the difference. I highly, highly recommend doing this. It's guilt-free eating at it's best!

Tacos with Homemade Seasoning
Recipe by A Toast to Taste
Photos by A Toast to Taste


Ingredients Needed:

For the Seasoning
2 Tbsp Chili Powder
2 Tbsp Cumin
1 Tbsp Garlic Powder
1 Tbsp Onion Powder
1 Tbsp Paprika
1 Tbsp Cayenne Pepper
1 Tbsp Oregano
1 Tbsp salt

** You will have leftover seasoning. Store in an airtight container for future use. **

For the Tacos
1 lb ground turkey or beef
diced tomato
shredded lettuce
shredded cheese
black olives, sliced
sour cream
8-10 tortillas

Combine all the taco seasonings in a small bowl. Set aside. In a medium skillet, brown the meat over medium heat. Add about 3 Tbsp of seasoning to the meat along with a 1/2 cup of water. Stir to combine well. Lower heat and let simmer for about 8-10 minutes.

While the meat is simmering, prepare the toppings. Assemble to your liking and enjoy!